What is DigitLab?
What is DigitLab?
Table of contents
-
What is Digitlab?
-
What tools does Digitlab contain?
-
How to prepare and start Digitlab on your computer?
What is Digitlab?
DigitLab is an especially adapted operating system based on Linux Ubuntu, prepared by Poznań Supercomputing and Networking Center in the framework of ACCESS IT Plus project. Its creators wanted to deliver a complete system which can be used for collections digitisation with the usage of free and widely available tools. DigitLab is useful for everyday work but what is also important it's a perfect solution for hands-on trainings. Thanks to using it, students have the access to homogenous learning environment, what significantly simplifies the work not only for them but also for tutors.
Everyone can download the system (it can be found on the site: http://digitlab.psnc.pl ) and try to prepare high quality digital objects by their own, maybe just only for their private use. The first release of the system was in September 2012, since then it was downloaded by hundreds of users and the number is still increasing.

Image 1. Digitlab's logo
The system was based on Ubuntu in version 12.04 LTS and prepared with a tool called Remastersys. It can be downloaded as an ISO image and which can be recorded on pendrive (min. 4GB) or DVD without the necessity of installation on the computer. More about Digitlab’s installation can be found in the last chapter of this lesson: “How to prepare and start Digitlab on your computer?”
What tools does Digitlab contain?
Despite there is a considerable number of programs in Digitlab, it is not hard to forsee that standard user will use only the main tools in a digitization process and the other ones will be used by a narrow, specialized groups. Those most popular and certainly used most often are:
ScanTailor – it is a tools that enables optimization, processing of scanning results. ScanTailor is an open-source program that lets the user do really extensive and comfortable processing of the scanning results in order to gain the optimal quality. This program makes such operations as: pages division, correction of distorted elements, adding and deleting borders. It works mainly automatically, without user’s interaction.
gscan2pdf – this program enables the conversion of scanned documents into the PDF/DjVu file with the support for performing OCR using Tesseract. User can choose which ones of caught pages should be affixed to the document.
GIMP – enables painting, deleting picture’s background (cutting), deleting items from photos (cloning), change of size, perspective and the rotation of pictures, making different colour operations, binding images through layers/masks and conversion many formats of graphic files. It is a counterpart of a popular, paid program Adobe Photoshop.
magicktiler – it is a script that enables image files conversion into formats appropriate for publication in their high resolution and creation of Zoomify, Google Maps, TMS and Pyramid TIFF images.
Tesseract – is currently one of the most precise OCR engines available on market; it has support for Polish language, German gothic fonts and many more.
Imagemagick - it is a command line tool, which enables automated graphic files processing. It can convert files form one format to another, add watermarks to files, change their resolution etc.
Phatch - similarly to imagemagick, it is a tool which enables automatic graphic files series processing. To be distinguished from imagemagick, Phatch has a graphic interface, which makes the usage of its advanced functions easier.
Audacity - a program which enables audio files edition. It owns a number of tools, which enable preparation of a final file form as well in lossless formats as in lossy ones such as f.ex. mp3
OpenShot video editor - a comfortable video files editor. OpenShot is also described in lesson "What should I know about software used in digitisation process"
Apart from mentioned programs, users can also find 3 exemplary ready to use digital libraries there, they are created on basis of three main tools used to it: dLibra (demo version for 3 publications), DSpace i Greenstone software. Just click on the icon visible on the desktop and after a while you can try to create your own digital library.
The default language of the system is English. Additionally there are also: Croatian, Serbian, Greek, Albanian, Turkish and Polish.
Full list of software is available project's Wiki.
How to prepare and start Digitlab on your computer?
1. Downloading the Digitlab system
The Digitlab system can be downloaded in ISO image format from the website of Digital Libraries Team of Poznań Supercomputing and Networking Center (http://digitlab.psnc.pl).
2. Preparing indispensable tools
In order to record the downloaded image it will be necessary to use a particular program.
An exemplary tool which can be used is a free program Universal USB Installer, which can be downloaded from the pendrivelinux.com website.
Sitelink to the program: http://www.pendriveliux.com/universal-usb-installer-easy-as-1-2-3/
3. Recording the Digitlab system on pendrive.
Having the Digitlab system image as well as the Universal USB installer program downloaded, the installation of the system on pendrive shall began. After plugging the pendrive in the computer (should have about 4GB free space), the Universal USB Installer should be started.
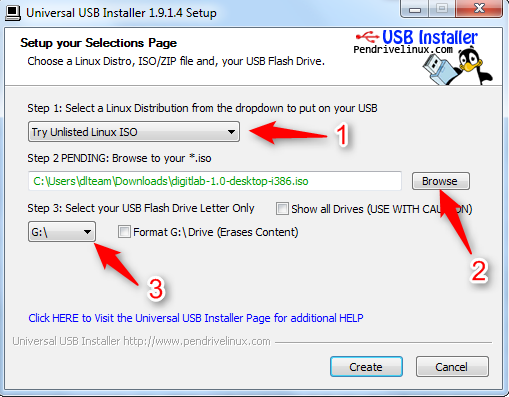
In the first step, the “Try unlisted Linux ISO” from the drop-down list box number “1” should be chosen. Then click “Browse” and pick the downloaded image of Digitlab system.

Image 2. USB Installer
The next activity is picking a letter which the pendrive that the system should be recorded on is marked with. The choice should be made on the drop-down list box number “3”.
After clicking “Create”, the recording Digitlab system process on pendrive should began. It is possible that the program will require a confirmation of making the operation which should be approved by clicking “Yes”.
4. Starting the system
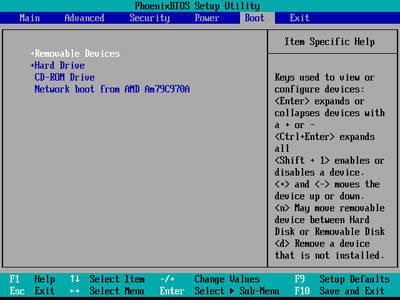
System can be run from pendrive only if the computer is configured properly. So as to start directly from the USB device it must be ensured that this device has higher priority of starting on the startup list in BIOS system than the computer’s hard disk.
Depending on the type of installed BIOS system, the entrance to the choice list of engines form which the startup can take place, should happen during the computer start by pressing F2, F10, F11 orESC. More information about settings in BIOS system may be found here: http://www.pendrivelinux.com/tag/bios-boot

Image 3. An examplary screen of starting engines order choice.
The change of startup tools order should not impact on the activity of original system installed on the computer. This change has a one-time character, after its implementation it is possible to use Digitlab without a necessity to change the system's startup configuration. In case of any problems it is recommended to ask computer scientist for some help.
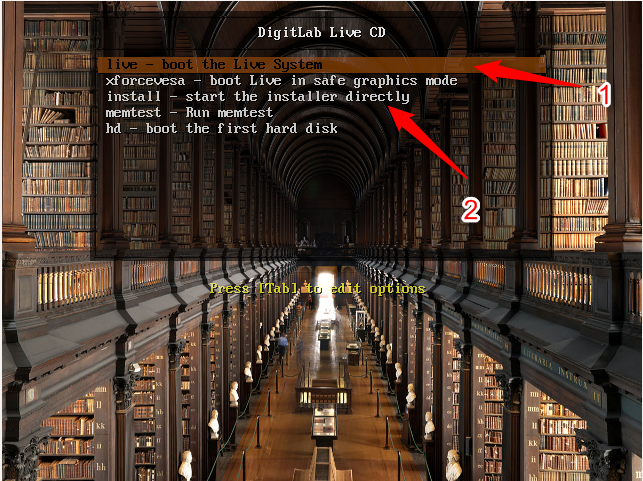
After starting the Digitlab system, in the choice window there are a few options. You may use the Digitlab system without setting any changes on your PC (the “1” option) or the system may be installed on the hard disk of the computer (the “2” option). In case of the option of system installation choice, the creator will start and lead the user step by step to flotation of the system.

Image 4. Digitlab's starting window